Freshly picked out of my garden today.
Must say their is definitely a taste difference thant store bought.


Inspiring heartbroken hope music dreams quotes stories gardening recipes vegetables friendship dogs love political
Freshly picked out of my garden today.
Must say their is definitely a taste difference thant store bought.
Corn needs plenty of space for two reasons — it takes up a lot of nutrition from the soil, and it is primarily pollinated by wind. As grains of pollen are shed by the tassels that grow from the plants’ tops, they must find their way to the delicate strands of silk that emerge from newly formed ears. To make sure silks are nicely showered with pollen, grow corn in blocks of short rows rather than in a long, single row. In a small garden, 15 plants can be grown in a 1 x 1,5 m bed.
Corn plants are not like tomatoes or most other vegetables, which bear over a long period of time. Instead, they form a few ears per stalk and they are finished. Because of this, gardeners who have the space often make 2 or 3 plantings 2 weeks apart to keep the harvest coming. I sow every 4 weeks. If you want corn only for fresh eating, plant a minimum of 10 to 15 plants per person
Soil, Planting, and Care
Corn needs a spot with that gets full sun and has fertile, well-drained soil with a pH of 6.0 to 6.8. It’s a good idea to improve the soil to improve nutrition and texture by mixing aged compost-enriched and bio ganic all purpose fertilizer. I use ecco pellets and it seems to work for me.
Plan to fertilize regularly because corn is a hungry plant. In addition to setting out young plants in the kind of nutrient-rich soil mentioned above, you’ll want to feed corn regularly with a continuous-release fertilizer Water your corn once or twice weekly, more if the weather is hot and dry.
Normal plants should grow fast with dark green healthy leaves. Corn will tell you if it is hungry by turning very light green. If so, feed again.
Corn grows fast and needs lots of water to grow properly. It also has shallow roots that make it susceptible to drought. Soaker hoses will insure that your corn gets the water it needs. However, for a large planting, soaker hoses may not be practical.
Planting Method
Sweet corn seeds should be planted 4 cm deep to ensure that the top soil temperature can reach 16°C to 20°C for effective germination as soon after planting as possible. Sow directly into ground because corn does not like to be transferred. Space plants: 20 – 30 cm apart
Sowing Time
In South Africa sow the maize seeds from August to March or even early April in warm areas with late winters and no frost.
Sweet corn takes 10 to 12 weeks to reach harvest readiness if the weather is warm and conditions ideal. If the growth period of sweet corn experiences cooler temperatures then the corn harvest can be delayed and could require up to 14 weeks.
Growing Tips
Add a layer of mulch to keep the soil moist and prevent weeds.ith water-soluble plant food regularly.of 6.0 to 6.8.
Improve native soil conditions by mixing in several inches of aged compost or other rich organic matter.
Corn will grow quickly when it is watered well. Check soil moisture often and consider using a soaker hose if you have a small plot.
Corn has a big appetite, so it’s important to feed plants with a water-soluble plant food regularly.
Add a layer of mulch to keep soil moist and prevent weeds.
Harvest corn when the ear feels plump and the silks are brown and dry.


I have seen a few post were people posted about planting corn and some concerns they have. I also noticed that some said planting 6 or 12 isn’t enough and pollution won’t take place correctly or will lead to almost no harvest because of the few plants they have. I did some research on this to understand why to little corn in your garden can lead to a disappointing harvest.
For backyard gardening it is recommend to plant a minimum of 9 plants at a time. Also plant them into blocks rather in long rows. Unlike many plants that are pollinated by insects, corn is pollinated by the wind. First, the male part of the plant, “tassels,” emerges from the top of the corn stalk.
When it comes to corn sex, the backyard gardener might needs to lend a hand. The female parts, or silks, emerge lower on the corn plant out of the soon-to-be ears of corn When a pollen grain lands on an individual silk, a tube is formed in the silk and genetic material is transferred to the ovary. A kernel of corn forms containing genetic material of both parents. Because each silk will form one kernel of corn, all of the silks have to be pollinated in order to have ears of corn packed with kernels. If there is insufficient pollination you will get spotty corn.
In a large field of corn, the agitation created by the wind will sufficiently spread the pollen (corn pollen can travel up to 1/2 mile). In your backyard, the pollen may blow into the neighbor’s yard completely bypassing the silks. Help pollinate your corn by following the below directions.
HOW TO POLLINATE CORN
Tassels usually emerge a few days before the silks. Wait until the silks have emerged before beginning this process. Remove a handful of pollen by hand. It is best to do this in the early morning on a dry day.


Spread the pollen over the corn silks. Make sure to spread it among different corn plants (of the same variety) to increase genetic diversity (especially if you are saving seed).

Repeat this process regularly until all of the silks have turned brown (in about one week

Resist the urge to peel the husk off of your corn until it is time for harvest. If you are growing sweet corn, you will harvest about two weeks after pollination.
POLLINATION AND SEED SAVING
Corn is not monogamous and mixes with other plants easily. To save corn seeds for future plantings, you need to ensure your plants do not cross-pollinate.
If you only grow one variety of corn (and your neighbors do not have any corn plants) this is not an issue.
If you want to grow multiple corn varieties try staggering the planting of the varieties by three to four weeks. this way pollen from one variety will be spent before the other varieties create silks. Chop the tassels off of the first variety after pollination.

Companion planting is the pairing of certain plants in the garden together for some mutual benefit. Certain plants may repel pests, others attract pollinators. With corn specifically, companion planting allows you to save space in your garden by growing pumpkins among the stalks. Some plants, like basil, drive away pests that could plague your maize. Still, other plants add nitrogen to the soil, which is important because corn feeds heavily on nitrogen. But maize benefits other plants, too: it acts as an ideal trellis for beans, or cucumber vines, and it can provide shade for low-growing crops.
COMPANION PLANTS FOR CORN
BASIL
One of corn’s chief pests is the maize weevil (Sitophilus zeamais), which can eat your sweet kernels in the garden and in storage. By planting pungent basil on the perimeter of your corn patch, it’ll keep maize weevils away with its smell.DILLAnnual flowers – are often overlooked in a vegetable garden, but they are more than just beautiful. Flowers will attract beneficial insects such green lacewings and parasitic wasps, which will help your plants fight against pests. Cosmos and zinnias are two easy-to-grow examples.aphids, corn ear worms, and cutworms. Dill can improve the flavor ot the corn too. Do not plant your dill until the corn is about 3 cm tall, so it doesn’t block sunlight.Dill is usually best planted in the early spring, as it will bolt in warm weather, but in this case, you want it to flower. Feel free to harvest some dill for delicious recipes, like this grilled salmon with dill sauce or this easy recipe for homemade pickles. Remember to let plenty of the dill flower, too, because that’s what will attract those beneficial parasitic wasps.
MARIGOLDS AND NASTURUIMS
Aromatic Plants – such as lavender, mint, oregano, dill, garlic, marigolds, basil, and sage and parsly.ladybugs to your garden.cial insects such as green lacewings and parasitic wasps, which will help your plants fight against pests. Cosmos and zinnias are two easy-to-grow examples.Tastier to aphids than corn, they’ll swarm the nasturtiums and (hopefully) leave your stalks, silks, and kernels alone. Be sure to plant your sacrificial crop several meters away from your corn. I pant it in containers and place it around in my veggie gardenEven better, if you plant nasturtiums, maize, and dill all together, the nasturtiums will attract aphids, while the dill will attract parasitic wasps. The wasps will eat the aphids, providing extra protection and keeping them from ever reaching your stalks and ears. And whatever nasturtiums don’t get eaten by aphids can be eaten by you. Toss the blooms and leaves in your favorite salad
ANNUAL FOWERS
Annual flowers – are often overlooked in a vegetable garden, but they are more than just beautiful. Flowers will attract beneficial insects such a green lacewings and parasitic wasps, which will help your plants fight against pests. Cosmos and zinnias are two easy-to-grow examples
Actually, the relationship is mutually beneficial: pole beans climb the stalks, using them as a trellis, while also helping to stabilize the maize and keep it from falling over when the ears mature – Pole beans grow well and you can plant them a couple cm from your maize once the shoots reach a height of 15 cm As the beans grow, train the shoots to wind around the stalks. Simply plant beans with their corn to fix nitrogen by absorbing it from the air or pulling it out of the ground. Any bean will work – bush, pole, wax, green, yellow, purple, string, flat, soy, Lima, runner, mottled, etc. The possibilities are endless.PUMPKINS (AND OTHER CUCURBITS)The vining cucurbits act as a living mulch for the corn and beans, keeping weeds at bay and locking moisture into the soil.Melons – are in the same family as squash and cucumbers and can be used in place of winter squash in a 3 sister’s arrangement. The long vines will offer the same protection and living mulch as squash does.
When allowed to bolt, these root vegetables can help keep corn borers away from your crop. Remember that radishes are a very quick crop to grow, often maturing in under 30 days, so use succession planting methods to keep a steady companion crop going for your corn.
Borage – can help repel worms that attack corn plants. Borage also attracts beneficial insects such as ladybugs to you garden.PEASPeas are another legume that fixes nitrogen in the soil, making it a perfect corn companion plant. Peas are planted as early as possible in spring, while corn is not planted until the soil is warm. Plant corn seeds directly in the pea patch to glean their nitrogen and save space.BORAGEBorage – can help repel worms that attack corn plants. Borage also attracts beneficial insects such as lady bugs to you garden.SUMMER SAVORYSummer Savory – is another herb that helps repel pests and attract beneficial bugs.THYEMEThyme – helps repel the corn earworm.AROMATIC PLANTSAromatic Plants – such as lavender, mint, oregano, dill, garlic, marigolds, basil, sage and parsley.
Below are plants that should be planted in another area of the garden from corn:Tomatoes – share common enemies with corn. Grown near each other, they will attract both the corn earworm and the tomato hornworm. Also both corn and tomatoes are heavy feeders and will compete for nutrients in the soil.Brassicas – All members of the cabbage family including broccoli, Brussels sprouts, kale, cauliflower should be planted apart from corn. Corn shades the brassicas too much, stunting their growth. As well as both crops are also heavy feeders and will compete for nutrients in the soil.
Earworm Beetles are one of the most harmful insects to corn. No plant is known to repel them. However, there are plants that attract other insects like the green lacewings and the soldier beetles that keep can keep the earworm moth population under control.The following plants will attract many beneficial insects to your garden and protect more than just your sweet corn. A variety of high-nectar plants will do the most good in your garden.


After months or so it felt to me struggling to get my cauliflowers to grow I almost gave up on them. I was over the moon when I saw my first little cauliflower het this morning. I could not wait sharing it with everyone on the farm. But now I’m just wondering do I need to blanch my cauliflower because I’m not sure what cultivar I planted.
I do think I will follow the blanching technique. After struggling to get it growing I will rather be safe than sorry.
Snow white snow bright
Cauliflower is one of the more difficult vegetables to grow, so why not take that extra step of balancing your cauliflower to add to the pleasure of harvesting a perfectly formed, sweet tasting head. White types need to have their heads sheltered in order to produce a crop with a snowy color and sweet flavor. It is recommended that you need to use the balancing technique to get the best harvest from your cauliflower plant.
Knowing when to blanch a cauliflower and how to blanch cauliflower will add the perfect finishing touches to a vegetable that is often difficult to grow.
What is Blanching?
This isn’t the same thing as the practice of par-boiling veggies by dunking them in boiling water before plunging them into an ice bath that you’re probably familiar with.
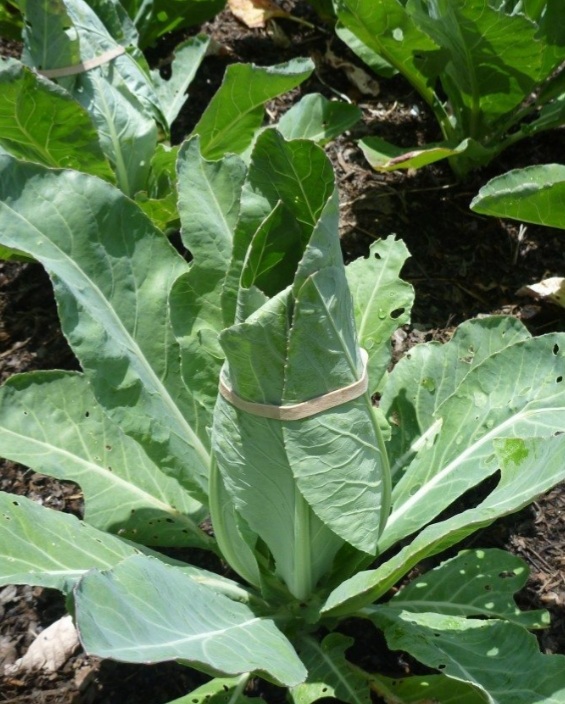
Blanching is the simple practice of binding large outer leaves together over and around developing cauliflower heads, to prevent them from yellowing or browning and developing a bitter flavor due to an overabundance of sun exposure.
When is the right time?
In common practice your cauliflower plant will be lush with leafy foliage. At this time, the first tiny curd should begin to appear. Mine took much longer to do this, so I’m holding thumbs that it will still mature into a nice big cauliflower. When cauliflower curd appears about the size of a chicken egg is perfect time. Smaller curds are already protected from the light by the leaves surrounding them. As they grow, they become more exposed and this is the time to begin blanching. Cauliflower curds develop rapidly into full heads so the window is small.
Do all cauliflower cultivars need to be balance?
Early White Hybrid has foliage that grows upward and outward, away from the heads. This does little, if anything, to shade the developing heads from the sun. These varieties require blanching by hand to protect them from damage
Others, such as ‘Snowball Self-Blanching,’ will naturally wrap their inner leaves around the maturing heads. Often this is enough to successfully shelter them from the intense rays, but they, too, can benefit from gardener intervention. In addition, if you’re self-blanching varieties do not seem to have enough foliar coverage, or if you are experiencing a heatwave, don’t hesitate to gather and bind their outer leaves to prevent the heads from discoloring.
How to do it.
It’s very easy. Imagine peeling a banana in reverse.
1. Choose a large leaf with which to begin.
2. Gently bend the leaf inward over the center of the plant. Hold the leaf in place.
3. Grasp a second leaf in the same fashion, and fold it over to meet the first, over the center of the plant. Hold the tops of both leaves together in one hand.
4. Use your other hand to gently bend a third leaf inward to meet the first two. Grasp all three leaves together in one hand, over the center of the plant.
5. If necessary, bend a fourth leaf inward to meet the other three, to effectively hide the developing head.
6. Use twine, rubber bands, or clothes pins to loosely bind the leaves you are grasping together. Secure them either at the top or around the middle, so they go over and around the head, completely covering it.
Imagine peeling a banana in reverse again. We have to make the open peels stay closed.
However, we also need to leave some room for airflow, for peeking in to monitor progress, and to allow the head to reach its mature dimensions of six to eight inches in diameter. This is why we bind them loosely.
Here’s a tip: Blanch on a dry day, after the morning dew has evaporated. This way, no moisture gets trapped near the curds and fungal growth is inhibited.
Harvest time
In one to three weeks, they should reach their mature dimensions and be ready for harvest. When the time is right, simply unbind the leaves to reveal your crop.

I’m no expert and learn something new everyday. If I look at some people veggie gardens I still think I have a far why to go before mine will look like that. But I wont give up and keep trying and keep going everyday. My biggest challenge is to amend my soil till its the way I want it to be and need to be to retain the right nutrition and water.
This is wat I learned over the last few months and slowly but surly its starting to work for me and I can see the difference in my garden.
Why use Compost in your garden
Compost serves primarily as a soil conditioner, whether it’s spread in a layer on the soil surface or is dug in. A garden soil regularly amended with compost is better able to hold air and water, drains more efficiently, and contains a nutrient reserve that plants can draw on. The amended soil also tends to produce plants with fewer insect and disease problems. The compost encourages a larger population of beneficial soil microorganisms, which control harmful microorganisms. It also fosters healthy plant growth, and healthy plants are better able to resist pests.
However, the quantity to use is another matter. How much compost is enough? Can you have too much compost in your garden? The appropriate amount of compost for plants depends on a number of factors
If you want to build healthy soil to develop permanent fertility in the garden, using compost is a good idea. Mixing in compost improves the soil structure, which allows the soil to hold more moisture. It also adds nutrients to the soil. Unlike fertilizer, compost improves the soil nutrients at a slow, steady pace. It fosters microbial activity in the soil as well, which improves nutrient uptake.
For best results, your garden soil should be made up of about five percent compost. You can either mix the compost into the soil or apply it on top like you would mulch. A good rule is to apply 2,5 cm to 7,6 cm in soil of a new garden bed and 2 cm existing beds.
How Much Compost Do I Need?
While compost is good for your garden soil, you’ll want to use it in moderation. As a general rule, adding 2.5 to 7.6 cm of compost to vegetable gardens is sufficient. The proper amount of compost for plants in your backyard depends on several factors such as what you want the compost to accomplish. If you are adding compost to improve the level of nutrients in the soil, you should get a soil test to determine which nutrients, if any, it needs. You might also run a nutrient check of the compost since different types of composted detritus will contain different levels of nitrogen and other nutrients. For example, lawn clippings will have less nitrogen than fruit peels and eggshells.
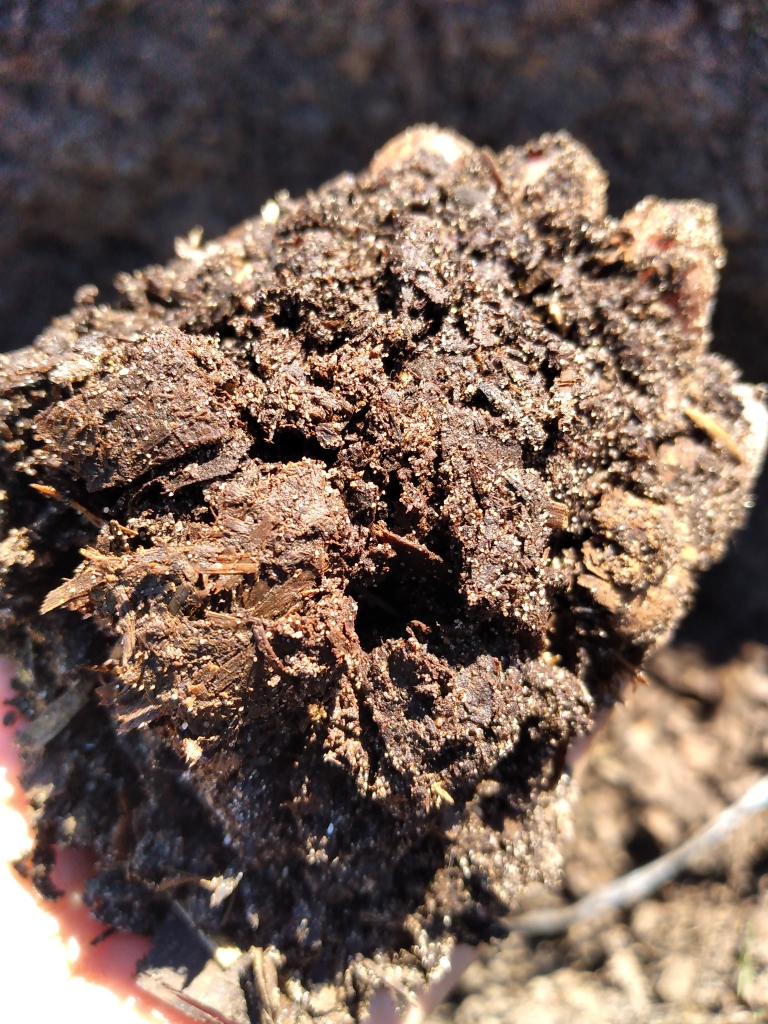
If you are considering adding compost to your soil in order to improve the soil structure, first touch your current soil to help you determine its texture. If it is very sandy, adding compost is great. Compost will improve the texture and helps sandy soil retain moisture and build up the nutrient supply.
This I can truly say works and you might have to do this a few more times digging over your beddings if you work in sandy soil. This was and still is my biggest challenge is to get the soil texture correct. I don’t think there is a quick fix for this but in time your soil will improve and your soil will retain more water.
Compost as side dressing
This is an organic way to fertilize plants throughout the season and is similar to mulching with compost in that they are both applied to the surface of the soil. The difference is that side dressing is applied in much smaller quantities. It is recommended that you place one handful of compost around the perimeter of the plant two to three times during the season.
Side dressing is commonly done when plants need extra nutrients for growth–at flowering or fruiting time and in the second half of the growing season. From midseason on vegetable crops make rapid growth and quickly use nutrients put in place before sowing or transplanting
To side-dress a plant, work the compost into the soil around the plant, starting about a 1cm from the stem, out to the drip line, taking care not to disturb the roots. I use my small garden fork to work compost in around plant if I can. For shallow rooted plants, leave the compost on the soil surface. The compost layer works best when left on top. It will breakup over time and it will your earthworm population will grow and help with the breakdown of your compost in to your soil.
After you apply the side dressing of compost, water it well so that the nutrients and microbial organisms are able to seep down into the soil. Compost adds much needed nitrogen to the soil, and unlike digging unfinished compost into the ground, does not compete with your plants for this essential nutrient.
I always keep my soil covered with organic mulch it just seems to work better over all for my plants as well as helping to retain water in the ground.

The simplest way to distinguish between compost and fertilizer is to remember this: Compost feeds the soil and fertilizer feeds the plants.
Fertilizer adds to the soil’s nutrient supply, but instead of feeding the soil food web, the ingredients in fertilizers are intended to meet the needs of fast-growing plants. While recommended amounts of compost can be quite general, fertilizer application rates are based on the needs of plants. Either organic or conventional fertilizers work well for vegetables, but organic fertilizers have been shown to be friendlier to the soil. Chemical fertilizer can also feed composting, but continual use may throw soil chemistry out of balance and discourage microbes.
Compost and organic fertilizers can work together. The organic matter in compost sponges up the fertilizer nutrients until they are needed by plants. Compost also provides many nutrients that plants need in small amounts, such as boron. You can use fertilizer without compost, but why miss an opportunity to increase your soil’s fertility and its ability to hold moisture? Soil that is regularly amended (i.e., improved) with compost becomes wonderfully dark and crumbly and often requires much less fertilizer compared to soil that has not yet benefited from regular helpings of compost.
Compost is just one of many soil amendments that alter the soil to improve its physical or chemical properties. Other soil amendments include lime, manure, leaf mold, ground bark, fertilizers, materials to change water retention levels, clay, gypsum, and more.
BENEFITS OF COMPOST
The advantages of using compost are as follows:
Because you can make your own compost, it is much cheaper and environmentally friendly than fertilizer.
Compost sounds like a winner for multiple reasons, but using compost in your garden also has its drawbacks.
DISADVANTAGES OF USING COMPOST
The disadvantages of using compost are as follows:
WHAT IS FERTILIZER?
Fertilizer comes in organic and inorganic forms. Organic fertilizers, like manure, compost, or bone meal, are derived strictly from plant and animal sources. Inorganic fertilizers are made from minerals, gasses, and inorganic waste materials. Fertilizers made from organic sources feed and enrich the soil. Organic, or synthetic fertilizers are fast acting, but can burn and damage plants.
All fertilizers are required by law to use the NPK ratio system to measure the levels of Nitrogen, Phosphorus, and Potassium (K on periodic chart) within them. So a fertilizer that is rated 12/12/12 has a balanced amount of each nutrient within it. Your soil or plants might be in need of one of the items versus the others, so you can choose a fertilizer based on what you need. If you’re growing something that needs a lot of nitrogen, you’d want one with a high ratio of it.
ADVANTAGES OF USING FERTILIZER
The advantages of using fertilizer in the garden are as follows:
DISADVANTAGES OF USING FERTILIZER
There are many more disadvantages to using fertilizer in the soil than there are disadvantages of using compost. The disadvantages of using fertilizer are as follows:
In my opinion if you going to use fertilizer rather use organic fertilizer that won’t harm the environment or humans. Be careful how you use it that you keep the balance in your soil as well as plant. Make sure you use the right fertilizer for what your plants need.
There is apparently quite a few reasons why carrots get forked and disformed. In my case I think I know what went wrong. I did not know carrots is highly sensitive plants and after they planted want to be replanted again.
Like many first time gardeners we tend to go to a nursery that and buy our seedlings we want to plant. Believing we going to get a good harvest from our seedlings we bought .The problem with this not all seedlings like to be transplanted and are best to plant direct. So if you decided to grow some carrots rather sow them directly into your garden, let them grow in the same spot until you ready to harvest them.
This was a valuable lesson to me and something I did not know. Carrots might be easy to grow but there is a few thing to remember they don’t like rocks, they don’t like clods, they don’t like too much nitrogen, they don’t like weeds, and they don’t like sharing their space. Make sure when you plant them knot to plant them to close to on another. Another thing to remember is that is better to plant carrots in different areas in your garden over next four to five years.
On the upside although the carrots was deformed and small they still tasted good. There is nothing more rewarding when you harvest something out of your garden and prepare them to eat. I learned a few things from my first attempt and hopefully I will have a better batch to harvest next time.

What an interesting bird, and wow he knows how to pose for the camera.